
Making of – A Virtual Reality App on Android for Google Cardboard with Unity 3D
Motivation
I’ve been interested in Mobile VR (that means low-cost VR without an expensive VR headset and without a high-end gaming PC) for some time. Last year, I took the UC San Diego edX course “How Virtual Reality works” and learned a lot in theory and by testing and reflecting about Google Cardboard apps during the weekly assignments. I thought, it would be absolutely fascinating to create something that really works on my Android smartphone and relates to the aspects we got into in theory last year, so I also took this years edX course “Creating Virtual Reality (VR) Apps” (CSE190x). I wanted to see how difficult it is and if it can be done without massive programming skills.
The result
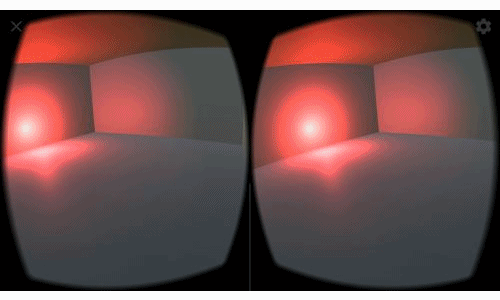
![]() Thanks to the edX UC San Diego course “Creating Virtual Reality (VR) Apps” there is an app, which actually works … This is Build 1.16 (March 22nd, 2018). With Google Cardboard, you don’t have (hand) controllers and therefore interaction happens by gaze and one button. Nevertheless, I’m quite impressed what can be done.
Thanks to the edX UC San Diego course “Creating Virtual Reality (VR) Apps” there is an app, which actually works … This is Build 1.16 (March 22nd, 2018). With Google Cardboard, you don’t have (hand) controllers and therefore interaction happens by gaze and one button. Nevertheless, I’m quite impressed what can be done.
If you actually want to create an app, I warmly recommend this 6-week-course which is part three of a “Professional Certificate Program”.
If you would like to try IDs VR App on your Android Smartphone at your own risk, here is the download link: https://www.idethloff.de/IDsVRapp/Build16_test.apk
How it began
You need a current Android smartphone, a Google Cardboard and a PC on which runs Unity 3D (https://unity3d.com/de) – there is a personal free edition “For beginners, students and hobbyists who want to explore and get started with Unity.” Btw, Unity 3D is one of three well-known VR authoring tools, the other ones are Lumberyard and Unreal Engine.
In order to test at any one time what you’ve created in Unity 3D, you need to connect the smartphone with the PC and allow some configuration options as “developer”.
It was a little bit tricky to install and configure the necessary Unity 3D environment and its many components: GoogleVRForUnity, Android SDK and JDK. Installing Android SDK (now via „Android Studio“ and afterwards the SDK component) was awful because it took a long long time and when I tried „Build and Run“ in Unity, I just got the error message „CommandInvokationFailure: Unable to list target platforms“ – Using the older version of JDK didn’t help either – at least until I deinstalled the Java 9 SDK. „Build and Run“ then led to numerous other error messages during which I had to change the player settings in Unity (Minimal API level, Package name) and had to change settings on my smartphone which I had to connect via USB during the process (enabling developer options). It was a very nice moment, when I saw the Unity icon in the Cardboard app on my smartphone and could see what I had created in Unity (which was just a room with four walls and a red point light)!
This animated gif shows the difference between week 1 (kind of „Hello World“-moment) and week 6 (finished Test-App):
Week 1 – Game Objects, Camera and Lighting
Game Objects / Scenery: You want to have some content in your app and there are a few possibilities for obtaining/placing 3D models: You can create them directly in Unity 3D or you can fetch them from the Unity Asset Store (there are many free ones) or you can import them, after you’ve created them in another application (e.g. 3D modeling tool). You have to think about reducing the complexity of the objects (polygons in the objects and pixels in the textures) so that the smartphone can keep up with its rendering power (which is much lower than that of a gaming PC). My app became bigger in size each week and the first thing, which blew up its size was a real-world-object which I scanned with the iPad TRNIO app (result shown on TRNIO web page) and afterwards converted in order to get a format which worked in Unity. Luckily, there is a statistics option in Unity, where you can see in Play Mode if you still get the recommended rate of at least 60fps.
This animated gif shows a picture of the original and of the 3D scan result of my hippo (in the app you can walk around it):

Lighting: You’ve got 4 light types in Unity: Ambient Light, Directional Light, Point Light, Spot Light – all these are things which you can do in Unity directly via the menus and it’s quite easy to add light sources like spotlight or point light and change color, range, intensity.
Camera: Depending on what’s in your VR world, when you want motion on your screen, you can either move the Unity virtual camera or move the world.
Week 2 – Gaze interaction
Actually, it isn’t gaze interaction, but sensors in the smartphone detect the movement of the head and act accordingly. Triggering an action with the “gaze cursor” (which was drawn in the center of the user’s view) can either be done by button on the headset (we did that in our app) or by the “stare and wait” method (which would be installed as a circle which fills out within a few seconds if you hold the gaze).
That was the moment when our scripting started: During the course we wrote 9 C#-scripts from scratch. I would have been totally lost, if there hadn’t been two enthusiastic course assistants who had pre-recorded a lot of video tutorials and showed step-by-step what had to be done.
Week 3/4/5/6 – UI and locomotion, selection and manipulation of objects, wayfinding, textures, spatial audio
Week 3/4/5/6 were a lot about menus in 3D, moving in 3D and how to avoid motion sickness (because in VR, “what you see is not what you get”). Our menu was installed as a UI with buttons, which were combined with scripts in order to make something happen. This meant: Making objects gazeable/transformable, instantiating prefab game objects like furniture by looking at the floor and moving around in the 3D world. Locomotion was technically realized as teleporting (e.g. moving from one spot in the 3D world to another spot instantly – a little bit of magic) and as walking. As we had constructed a room with 4 walls, the walking had to be limited by script but it was a nice touch to allow a view through the walls (That’s why the skybox-feature with a 360 photo made sense). Teleportation avoids motion sickness but can also be a bit disorienting. Therefore, later on, we added a minimap of our room by adding an additional camera with projecting its view as texture on a second UI. It’s quite interesting to see the minimap updating automatically when objects are added or the user (which is represented as a sphere) moves through the room. It was important to make the minimap UI and the other UI user-centered and draggable in order to keep them useful when moving around in the room. For the implementation of these features we needed a lot of new scripts … In comparison, it was very easy to decorate a little bit by giving new textures to the game objects – it was nice to use own photos, import them into Unity and just drop them onto the chosen objects in the scene view – however, what I did wasn’t ideal because the size of the app increased a lot … It was also very relaxing to add spatial audio (e.g. a radio game object and a sound file combined with some configurations in Unity) in order to get more realism: You need a headset with your smartphone to identify if the sound comes from the left or right, but it’s very impressive. We also covered the topic “pitfalls to avoid” (among them “creating a VR app that doesn’t actually require VR”, “making (wrong) assumptions about users” or technical problems like “visual lag”) and the necessity of usability testing (test for functionality & test for comfort) as well as user training. One way of user training would be a demo video and I opted for a screen recording while using the cardboard instead of recording during the Game View Play mode in Unity on my PC.
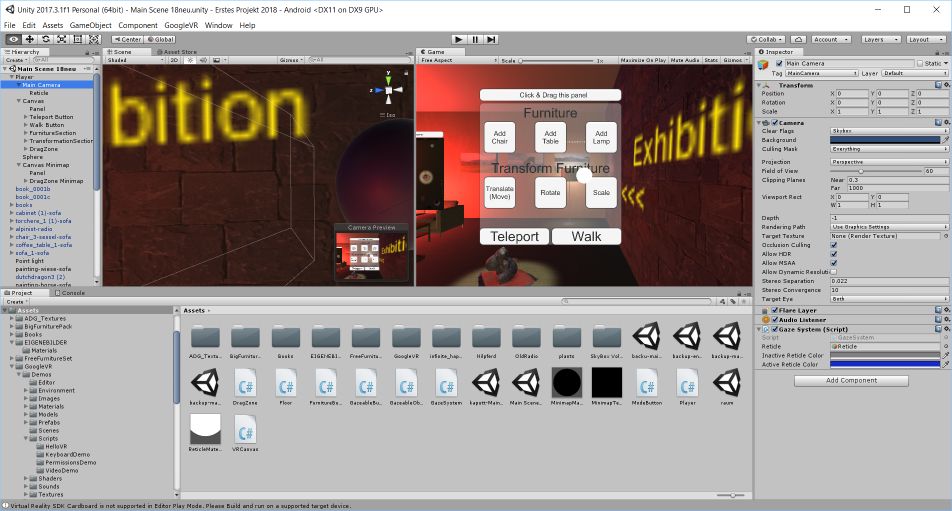
This picture shows my project in the Unity 3D interface:
A lot of testing happened in Unity itself with the mouse moving around for simulating head movement:
My conclusion
Yes, it was possible to create a VR app which is working (mostly, there are some bugs), but I couldn’t have done it without the before-mentioned video tutorials of CSE190x. It was fun, it was hard work and I appreciate the work of the MOOC team of Prof. Schulze, UC San Diego. The course was very good in discussing and showing step-by-step the realization of important concepts in Mobile VR.
(My verified CSE190x course certificate)
Creating a specific VR app just isn’t possible without programming skills although Unity 3D already does a lot of good work. However, in my opinion, it would be difficult to implement new things just by searching in Unity 3D web pages or forum entries – at least, this is where I failed, when I looked around a little bit for additional features.
Didactical implications for Mobile VR
It would be “comparatively easy” to implement a scenery where students could explore their surroundings and experience a (hopefully immersive) 3D world. However, you would have to create convincing 3D models of the chosen topic and implement interactions so it doesn’t get boring. I am still surprised/impressed what you can do just with gaze interaction: adding prefab objects and transforming them offers a wide range of possibilities and not just a kind of “interior design app”. Gaze interaction isn’t as intuitive as hand controllers would be, but it can be learned fast (even without the help of a demo video or a tutorial). Good to know: Using text in 3D isn’t a good idea, because you can’t really read it, e.g. you have to do without it and maybe instead use sound for information/instructional purposes. Unfortunately, I’ve seen many VR apps where you have a considerable lag and see pixels – there’s no benefit in those apps, where either the loading via Internet or just the smartphone are too slow. It will be interesting to see the progress in technical development – maybe creating VR apps someday will be as easy as creating a homepage – who still remembers writing html code? Most teachers are lost, when I tell them about the “switch to html”-icon in the Moodle text editor.
And who could write and understand C# scripts which are necessary for creating VR apps with Unity 3D? Therefore, creating VR apps which exceed showing a 3D world fitted with very simple objects and where you can move around a little bit, at present, will become very expensive in production. And still, you couldn’t compete with the perfect graphics & range of interactions in games on Sony PS4 etc. … Last but not least: “Don’t create a VR app that doesn’t actually require VR”.
Nevertheless, I’d recommend that you look at some existing VR apps and be impressed and enjoy the journey. It’s an intriguing experience, especially if you see it for the first time.