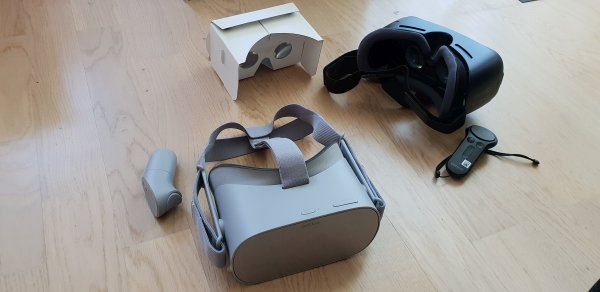
Erst Cardboard und Samsung Gear VR, nun Oculus Go

3 VR-Brillen

Eine logische Erweiterung meiner VR-Tests mit Smartphone (also relativ bezahlbare niederschwellige VR) ist die im Juni 2018 in Deutschland auf den Markt gekommene Oculus Go. Dieses VR-Headset benötigt kein Smartphone (hat einen vergleichbaren Chip integriert, braucht also auch keinen PC) und greift auf die Apps des Oculus Stores zu (https://www.oculus.com/experiences/go/ – weitgehend analog der Samsung Gear VR). Wie bei Smartphone-VR gibt es „nur“ 3DoF, also kein Positional Tracking. Im Lieferumfang enthalten ist ein Hand-Controller, der zum Steuern der Menus und Anwendungen benutzt/benötigt wird. Für das Einrichten der Oculus Go ist allerdings wiederum eine Smartphone-App und ein Facebook-Account oder Oculus-Account nötig. Der Betrieb der Oculus Go erfolgt dann entweder mit W-LAN (keine „Captive Portals“ möglich, bei denen man sich anmelden müsste) oder – nach Download von Inhalten – teils auch offline.

Test einiger kostenloser Oculus Go Apps
Das App-Angebot im Rahmen des Einrichtens enthielt „Dead and Buried“ , was ich schon von der Samsung Gear VR her kannte, mich dennoch wieder überrascht hat bzgl. des hohen Grades an Immersion (vielleicht auch weil der Oculus Go Hand-Controller so gut funktioniert). Ebenfalls sehr immersiv ist die „Epic Roller Coaster“ App, bei der ich allerdings zum allerersten Mal im Rahmen meiner VR-Tests so etwas wie Motion Sickness verspürte – insofern war hier der Spaßfaktor gering. „Guided Meditation VR“ (https://www.oculus.com/experiences/app/929143807179080/) wäre eine schöne Idee, konnte mich aber aufgrund der Optik noch nicht überzeugen, da schaue ich mir lieber die reale Welt an – vielleicht wäre sie aber für den Winter geeignet…?

Aufgrund der immer noch zu geringen Auflösung der Brillen wirken Real World 360-Grad-Filme und 360-Grad-Bilder auch bei der Oculus Go gerastert (Fliegengittereffekt) bzw. Videos ohne Download noch dazu oft ruckelig / verschwommen. Bei „Invasion“ , dem extra für VR erstellten Animationsfilm, ist das eher kein Thema – dieser gefällt mir auch auf der Oculus Go sehr gut (Download über Within App). Interessante Anwendungen innerhalb der Within-Player-App waren für mich „The People’s House – inside the White House with Barack and Michelle Obama“ (läuft 22 min) und das künstlerisch gestaltete „Within Original“ Musikvideo „Hallelujah“ (remastered from 6DoF to Mobile VR – daher leider ohne räumliche Bewegung, die durch die Lichtfeldkamera sonst möglich wäre). Die App „International Space Station Tour“ (https://www.oculus.com/experiences/app/1055629531142378/) bietet großen Detailreichtum und ist für am Thema Interessierte sicherlich eine Bereicherung.
Medizin-Apps gibt es offensichtlich schon jede Menge, ein kostenloses Beispiel ist der Ausschnitt „Skeletal system“ aus der „Human Anatomy VR“ (https://www.oculus.com/experiences/app/1658650407494367/). Dort kann man mittels verschiedener Funktionen sein Wissen testen bzgl. der Benennung von Knochen des menschlichen Körpers. Von der 360-Grad-Umgebung macht diese App anderen Gebrauch als die App „Body VR“ (= Travel through the bloodstream)(https://www.oculus.com/experiences/app/869485659814410/).

Eigene 360 Grad Bilder
Bei Google Cardboard und Samsung Gear VR nutzt man ja das Smartphone und hat somit direkten Zugriff auf die dortigen 360-Grad-Bilder, bei der Oculus Go braucht man das mitgelieferte USB-Kabel: Per Anschluss an einen Windows-PC ließen sich (kurz Oculus aufsetzen und Datenzugriff erlauben) meine mit der Kamera „Samsung Gear 360“ erstellten 360-Grad-Bilder im Windows Explorer auf die Oculus Go (Ordner Pictures) kopieren. Die meisten wurden sofort als 360 Grad erkannt und gekennzeichnet, einige „leisteten aber etwas Widerstand“ und ich musste das Format selbst setzen.
Innerhalb der Anwendungen der Oculus Go erstellte Screenshots kann man übrigens bei Datenzugriff aus dem Verzeichnis oculus/Screenshots auf seinen PC kopieren.

Neuer Webbrowser in VR
Getestet habe ich auch „Firefox Reality“ , die gerade erst erschienene  Version 1.0 von Mozillas Browser für VR-Headsets: Mit Hand-Controller war das Eingeben von URLs kein Problem, die Spracheingabe war etwas gewöhnungsbedürftig: heise.de musste ich buchstabieren, die Tagesschau hingegen wurde sofort erkannt. Erstaunlich gut ist die Optik, denn normalerweise vertragen sich VR-Brillen und Text (auf Webseiten ein Kernelement) nicht besonders gut. Das Konzept, die dargestellte Webseite in verschiedenen Formaten anzuzeigen (Vergrößerung 0.5, 1.0. 2.0 etc. zusätzlich zum Vergrößern des Browser-Fensters mittels Hand-Controller) funktionierte gut. Die 100-Sekunden-Tagesschau war mit Oculus Go in guter Bild- und Tonqualität, was ich so nicht erwartet hätte. Dennoch würde ich mir keine längere Suche antun, was aber weniger mit Firefox Reality als mit der – wie ich finde – sehr unbequem zu tragenden Oculus Go zusammenhängt.
Entdeckt habe ich durch die Startseite von „Firefox Reality“ das Format „PanoMoments“: weder Foto noch Video, eher VR time Loop, und muss man tatsächlich mal gesehen haben, um es zu verstehen…
Einen Bericht zu Firefox Reality liefert heise: https://www.heise.de/newsticker/meldung/VR-Browser-Mozilla-veroeffentlicht-Firefox-Reality-1-0-4167174.html

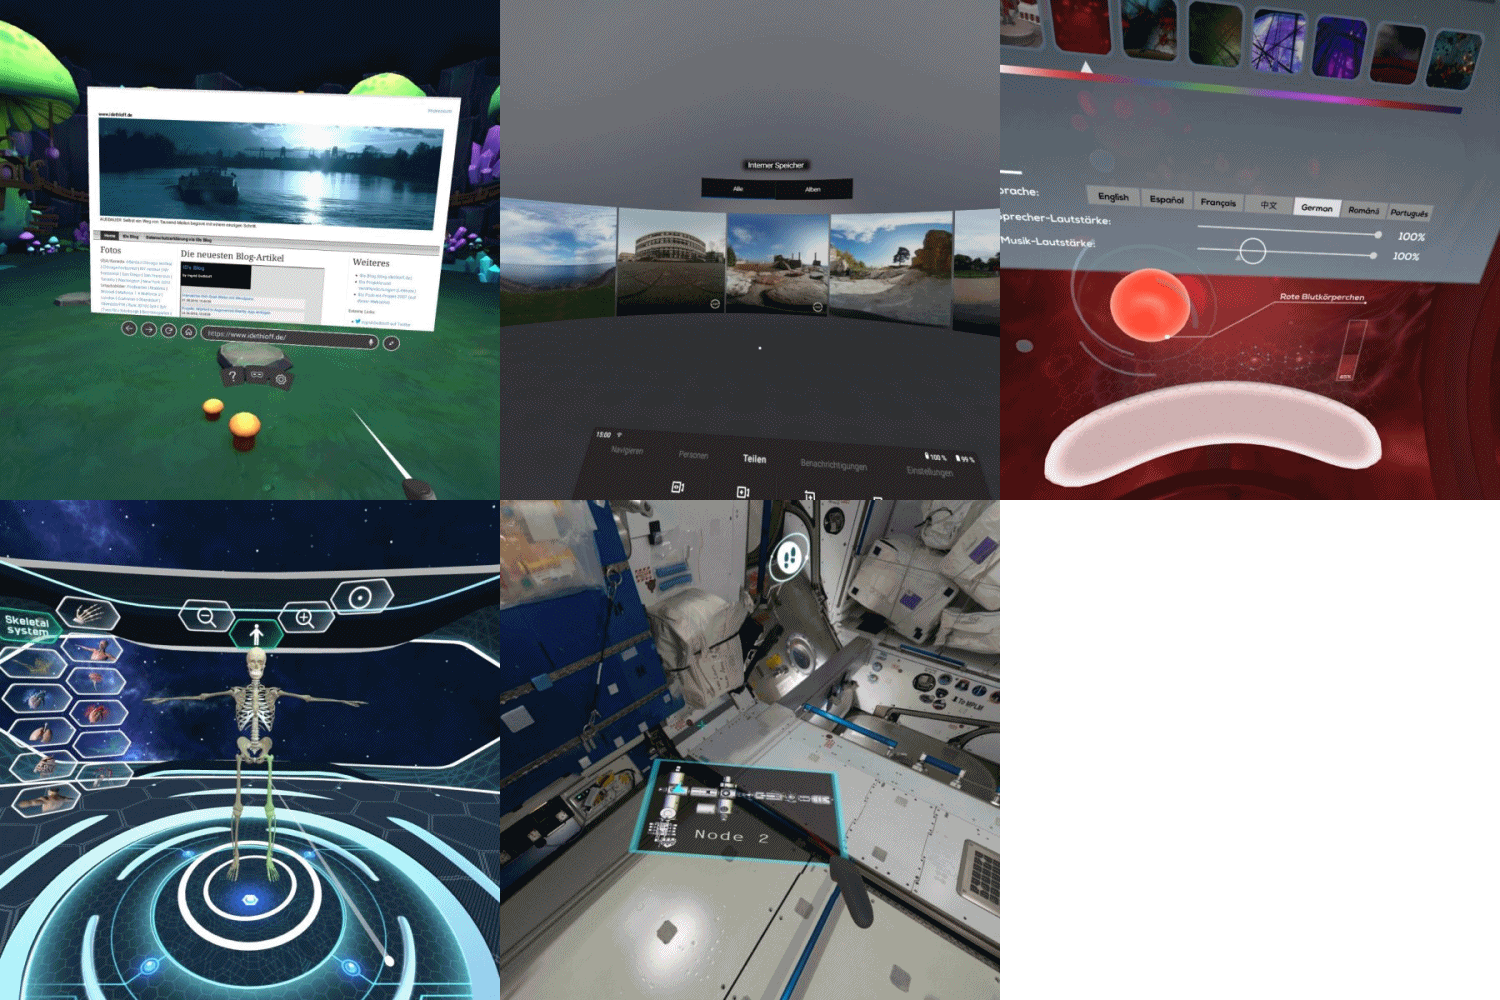
Oculus Go ScreenshotsScreenshots aus Firefox Reality, Oculus Gallery, Body VR, Human Anatomy VR, ISS Tour

Mein Fazit im Vergleich mit Cardboard und Samsung Gear VR

Das Headset Oculus Go liefert die beste Bild-, Ton- und Navigations-Qualität – ist aber leider sehr unbequem und hat bei Betrieb bei mir immer noch einen chemischen Geruch. Die Version mit 32GB kostet 219 Euro und ist damit deutlich günstiger als die High-End-VR-Brillen Oculus Rift und htc Vive, die zusätzlich einen starken PC benötigen.

Einige Vorteile

  • einfache Installation
  • alles integriert, kein Zusammenbauen nötig vor Benutzen
  • gute Bildqualität
  • integrierter guter Ton, der auch Raumklang bietet
  • sehr gut funktionierender Hand-Controller
  • App-Paket mit kostenlosen Apps gleich beim Einrichten angeboten
  • alleinige Funktion als VR-Brille, daher keine störenden Smartphone-Features

Einige Nachteile

  • sehr schwer (im Vergleich  zu Cardboard und Samsung Gear VR)
  • kein Drehregler wie bei Samsung zum Scharfstellen, daher Scharfstellen über Verschieben der Position der Brille auf den Wangenknochen, was für unbequeme Haltung sorgt
  • unangenehmer Geruch

Interaktive 360-Grad-Bilder mit Marzipano

Lange habe ich nach einem Viewer gesucht, der auf der eigenen Webseite 360-Grad-Bilder darstellen kann. Marzipano scheint mir hierzu eine gute Lösung, zumal man bei Bedarf zusätzliche Info-Symbole mit Erläuterungstexten einbauen kann sowie mehrere 360-Grad-Bilder untereinander verlinken kann. Nützlich ist auch die „Autorotate“-Funktion, die man jedoch per Maus jederzeit übersteuern kann. Alles in allem also eine gute technische Voraussetzung für die Gestaltung von Lernszenarien.

Über http://www.marzipano.net/ und den Button „Marzipano Tool“ kann man eigene 360-Grad-Bilder (in meinem Fall die mit der „Samsung Gear 360“ erstellten Bilder) hochladen und interaktiv ausstatten bzw. die Viewer-Anzeige festlegen. Über „Export“ wird ein zip-File erzeugt, das man dann entpackt auf den eigenen Webserver legen oder auch lokal im Browser betrachten kann.
Hier ein Beispiel anhand einiger Urlaubsbilder von der Ostsee mit zwei verschiedenen Konfigurationen für die gleiche Zieldatei:

A) Eingebunden als iframe

B) Als Link zum Vollbild mit diversen View Control Buttons: https://www.idethloff.de/fotos/360-timmendorf-autorotate/app-files/

Eine ausführliche Erläuterung der Marzipano-Möglichkeiten incl. eines sehr guten Erklärvideos findet man auf dem Landesbildungsserver Baden-Württemberg: http://www.schule-bw.de/faecher-und-schularten/gesellschaftswissenschaftliche-und-philosophische-faecher/geographie/material/geographie-interaktiv/marzipano


Projekt: Nilpferd in Augmented-Reality-App einfügen

Hello AR U3D App im Einsatz
Das Ergebnis: Modifizierte Hello AR U3D App im Einsatz (zum Vergrößern anklicken)

Es hilft nichts: Wenn man im E-Learning up to date bleiben möchte, muss man ständig neue Technik kaufen. So auch in diesem Fall, um aktuelle Augmented-Reality-Apps auszuprobieren. Sowohl mein Samsung S6 als auch mein iPad Air2 waren gerade die Geräte, die nicht mehr bzgl. ARCore/ARKit unterstützt werden. Insofern Kauf von S9 in der Hoffnung, wieder für ca. 2 Jahre aktuell zu sein.

Vorhandene Apps ausprobieren ist eine Sache, selber so etwas zu gestalten eine ganz andere Sache. Nach „Blooms Taxonomie“ wären wir da schon auf einer recht hohen Ebene …

Sehr beeindruckend finde ich die AR-Möglichkeiten mittels des recht neuen ARCore für Android mit den Merkmalen „Umgebungserkennung, Bewegungserkennung und Lichtabschätzung“: Gut gefallen haben mir z.B. die Apps „Google Expeditionen AR“ (Vincent Van Gogh-Gemälde u.v.m.), „NASA SpacecraftAR“ oder „Paint AR“ (virtuelle Luftschlangen incl. Schatten mit integrierter Recording-Funktion u.v.m.).
Will mann nun ARCore-Apps selbst erstellen, gibt es netterweise für Unity 3D seitens Google hier ein einfaches „Hello AR“-Beispiel. Dann muss man „nur noch“ in Unity 3D die entsprechenden AR-Konfigurationen machen, um dieses Beispiel dann auf ein für ARCore passendes Handy (und das sind derzeit eben leider nur ganz wenige Modelle, s.a. https://developers.google.com/ar/discover/supported-devices) zu übertragen.

Idee
Mein Ziel war, ähnlich den o.g. Apps mein Stofftier-Nilpferd in eine ARCore nutzende Android-App zu bekommen, d.h. das Nilpferd-3D-Modell später in beliebigen realen Räumen einfügen zu können, näher darauf zuzugehen bzw. sich davon wegzubewegen sowie es im realen Raum als 3D-Modell wahrzunehmen. Die Umsetzung dieser Idee war dank des „Hello AR“-Beispiels (und vermutlich meiner Vorkenntnisse in Unity 3D) erstaunlich einfach.

Umsetzung
Verwendet habe ich für das Ganze meine bereits für VR genutzte Unity 3D-Version „2017.3.1f1 Personal 64bit“. Hilfreiche Anleitungen für ARCore waren:

Was leider nicht geklappt hat, war „Instant Preview“: https://developers.google.com/ar/develop/unity/instant-preview
Ausschlaggebend ist wohl „On Windows machines with an integrated GPU, the Unity Editor’s video feed is not mirrored back to your phone.“ Aber da es nicht lange dauert, per „Build and Run“ das App-apk zu erzeugen und per USB aufs Handy zu übertragen, kann ich verschmerzen, dass der integrierte Player in Unity 3D (im Gegensatz zur VR-Progammierung, wo er gut klappt), hier nicht mitmacht.

Ein (nicht perfektes, aber zumindest funktionierendes) 3D-Modell des Stofftier-Nilpferdes hatte ich ja schon für meine VR-App verwendet und somit konnte ich es in Unity 3D auch für das AR-Projekt nutzen: Konkret habe ich dafür einfach im Inspector im „Hello AR Controller“-Skript bei „Andy Android Prefab“ das kleine grüne Android-Modell durch mein Nilpferd-Modell ersetzt. Korrigieren musste ich anschließend nur noch den Nilpferd-Modell „Scale Factor“, weil das Objekt sonst so groß im Raum erschien, dass weder Umgebungs- noch Bewegungserkennung richtig funktionierten.

Ausprobieren der modifizierten AR-App
Unterwegs im Waldpark Mannheim habe ich gestern nachmittag einige Male die von mir bzgl. des Nilpferdes angepasste ARCore App „Hello AR U3D“ ausprobiert. Im Folgenden drei Screenshots aus der App als animiertes gif – Start war zu Hause im Flur (die Türstopper sind „echt“, das Nilpferd ist per AR eingefügt). Was man auf den Bildern leider nicht sieht, ist, dass es sich bei dem eingefügten Nilpferd-Modell um ein Objekt handelt, um das man mit Blick aufs Handy-Display herumgehen kann, wobei sich die Perspektive ändert. Ebenso möglich ist es, sich von dem Objekt zu entfernen bzw. sich zu nähern, wodurch es dann größer erscheint und man mehr Details sieht. Das zu zeigen wäre nur per Screenrecording möglich gewesen, was mir jedoch zu aufwändig war.

Wie schwierig es wäre, mit Unity 3D & ARCore nun eine sinnvolle Lern-App zu erstellen (die ja deutlich mehr Features benötigen würde als in dem Beispiel-Skript enthalten sind), kann ich an dieser Stelle noch nicht sagen. Wichtig wären auf jeden Fall zuvor gut erstellte 3D-Modelle.

Nilpferd unterwegs in AR
Screenshots aus modifizierter Hello AR U3D App

Making of … IDs VR App

Making of – A Virtual Reality App on Android for Google Cardboard with Unity 3D

Motivation
I’ve been interested in Mobile VR (that means low-cost VR without an expensive VR headset and without a high-end gaming PC) for some time. Last year, I took the UC San Diego edX course “How Virtual Reality works” and learned a lot in theory and by testing and reflecting about Google Cardboard apps during the weekly assignments. I thought, it would be absolutely fascinating to create something that really works on my Android smartphone and relates to the aspects we got into in theory last year, so I also took this years edX course “Creating Virtual Reality (VR) Apps” (CSE190x). I wanted to see how difficult it is and if it can be done without massive programming skills.

The result
Logo IDs VR AppThanks to the edX UC San Diego course “Creating Virtual Reality (VR) Apps” there is an app, which actually works … This is Build 1.16 (March 22nd, 2018). With Google Cardboard, you don’t have (hand) controllers and therefore interaction happens by gaze and one button. Nevertheless, I’m quite impressed what can be done.
If you actually want to create an app, I warmly recommend this 6-week-course which is part three of a “Professional Certificate Program”.

If you would like to try IDs VR App on your Android Smartphone at your own risk, here is the download link: https://www.idethloff.de/IDsVRapp/Build16_test.apk

How it began
You need a current Android smartphone, a Google Cardboard and a PC on which runs Unity 3D (https://unity3d.com/de) – there is a personal free edition “For beginners, students and hobbyists who want to explore and get started with Unity.” Btw, Unity 3D is one of three well-known VR authoring tools, the other ones are Lumberyard and Unreal Engine.
In order to test at any one time what you’ve created in Unity 3D, you need to connect the smartphone with the PC and allow some configuration options as “developer”.
It was a little bit tricky to install and configure the necessary Unity 3D environment and its many components: GoogleVRForUnity, Android SDK and JDK. Installing Android SDK (now via „Android Studio“ and afterwards the SDK component) was awful because it took a long long time and when I tried „Build and Run“ in Unity, I just got the error message „CommandInvokationFailure: Unable to list target platforms“ – Using the older version of JDK didn’t help either – at least until I deinstalled the Java 9 SDK. „Build and Run“ then led to numerous other error messages during which I had to change the player settings in Unity (Minimal API level, Package name) and had to change settings on my smartphone which I had to connect via USB during the process (enabling developer options). It was a very nice moment, when I saw the Unity icon in the Cardboard app on my smartphone and could see what I had created in Unity (which was just a room with four walls and a red point light)!

This animated gif shows the difference between week 1 (kind of „Hello World“-moment) and week 6 (finished Test-App):

Animated Gif showing the difference between week 1 and week 6

Week 1 – Game Objects, Camera and Lighting
Game Objects / Scenery: You want to have some content in your app and there are a few possibilities for obtaining/placing 3D models: You can create them directly in Unity 3D or you can fetch them from the Unity Asset Store (there are many free ones) or you can import them, after you’ve created them in another application (e.g. 3D modeling tool). You have to think about reducing the complexity of the objects (polygons in the objects and pixels in the textures) so that the smartphone can keep up with its rendering power (which is much lower than that of a gaming PC). My app became bigger in size each week and the first thing, which blew up its size was a real-world-object which I scanned with the iPad TRNIO app (result shown on TRNIO web page) and afterwards converted in order to get a format which worked in Unity. Luckily, there is a statistics option in Unity, where you can see in Play Mode if you still get the recommended rate of at least 60fps.
This animated gif shows a picture of the original and of the 3D scan result of my hippo (in the app you can walk around it):
Animated Gif showing photo of hipp in real world and hippo as 3D scan

Lighting: You’ve got 4 light types in Unity: Ambient Light, Directional Light, Point Light, Spot Light – all these are things which you can do in Unity directly via the menus and it’s quite easy to add light sources like spotlight or point light and change color, range, intensity.
Camera: Depending on what’s in your VR world, when you want motion on your screen, you can either move the Unity virtual camera or move the world.

Week 2 – Gaze interaction
Actually, it isn’t gaze interaction, but sensors in the smartphone detect the movement of the head and act accordingly. Triggering an action with the “gaze cursor” (which was drawn in the center of the user’s view) can either be done by button on the headset (we did that in our app) or by the “stare and wait” method (which would be installed as a circle which fills out within a few seconds if you hold the gaze).
That was the moment when our scripting started: During the course we wrote 9 C#-scripts from scratch. I would have been totally lost, if there hadn’t been two enthusiastic course assistants who had pre-recorded a lot of video tutorials and showed step-by-step what had to be done.

Week 3/4/5/6 – UI and locomotion, selection and manipulation of objects, wayfinding, textures, spatial audio
Week 3/4/5/6 were a lot about menus in 3D, moving in 3D and how to avoid motion sickness (because in VR, “what you see is not what you get”). Our menu was installed as a UI with buttons, which were combined with scripts in order to make something happen. This meant: Making objects gazeable/transformable, instantiating prefab game objects like furniture by looking at the floor and moving around in the 3D world. Locomotion was technically realized as teleporting (e.g. moving from one spot in the 3D world to another spot instantly – a little bit of magic) and as walking. As we had constructed a room with 4 walls, the walking had to be limited by script but it was a nice touch to allow a view through the walls (That’s why the skybox-feature with a 360 photo made sense). Teleportation avoids motion sickness but can also be a bit disorienting. Therefore, later on, we added a minimap of our room by adding an additional camera with projecting its view as texture on a second UI. It’s quite interesting to see the minimap updating automatically when objects are added or the user (which is represented as a sphere) moves through the room. It was important to make the minimap UI and the other UI user-centered and draggable in order to keep them useful when moving around in the room. For the implementation of these features we needed a lot of new scripts … In comparison, it was very easy to decorate a little bit by giving new textures to the game objects – it was nice to use own photos, import them into Unity and just drop them onto the chosen objects in the scene view – however, what I did wasn’t ideal because the size of the app increased a lot … It was also very relaxing to add spatial audio (e.g. a radio game object and a sound file combined with some configurations in Unity) in order to get more realism: You need a headset with your smartphone to identify if the sound comes from the left or right, but it’s very impressive. We also covered the topic “pitfalls to avoid” (among them “creating a VR app that doesn’t actually require VR”, “making (wrong) assumptions about users” or technical problems like “visual lag”) and the necessity of usability testing (test for functionality & test for comfort) as well as user training. One way of user training would be a demo video and I opted for a screen recording while using the cardboard instead of recording during the Game View Play mode in Unity on my PC.

This picture shows my project in the Unity 3D interface:
Unity 3D Oberfläche
A lot of testing happened in Unity itself with the mouse moving around for simulating head movement:

My conclusion
Yes, it was possible to create a VR app which is working (mostly, there are some bugs), but I couldn’t have done it without the before-mentioned video tutorials of CSE190x. It was fun, it was hard work and I appreciate the work of the MOOC team of Prof. Schulze, UC San Diego. The course was very good in discussing and showing step-by-step the realization of important concepts in Mobile VR.
(My verified CSE190x course certificate)
Creating a specific VR app just isn’t possible without programming skills although Unity 3D already does a lot of good work. However, in my opinion, it would be difficult to implement new things just by searching in Unity 3D web pages or forum entries – at least, this is where I failed, when I looked around a little bit for additional features.

Didactical implications for Mobile VR
It would be “comparatively easy” to implement a scenery where students could explore their surroundings and experience a (hopefully immersive) 3D world. However, you would have to create convincing 3D models of the chosen topic and implement interactions so it doesn’t get boring. I am still surprised/impressed what you can do just with gaze interaction: adding prefab objects and transforming them offers a wide range of possibilities and not just a kind of “interior design app”. Gaze interaction isn’t as intuitive as hand controllers would be, but it can be learned fast (even without the help of a demo video or a tutorial). Good to know: Using text in 3D isn’t a good idea, because you can’t really read it, e.g. you have to do without it and maybe instead use sound for information/instructional purposes. Unfortunately, I’ve seen many VR apps where you have a considerable lag and see pixels – there’s no benefit in those apps, where either the loading via Internet or just the smartphone are too slow. It will be interesting to see the progress in technical development – maybe creating VR apps someday will be as easy as creating a homepage – who still remembers writing html code? Most teachers are lost, when I tell them about the “switch to html”-icon in the Moodle text editor.
And who could write and understand C# scripts which are necessary for creating VR apps with Unity 3D? Therefore, creating VR apps which exceed showing a 3D world fitted with very simple objects and where you can move around a little bit, at present, will become very expensive in production. And still, you couldn’t compete with the perfect graphics & range of interactions in games on Sony PS4 etc. … Last but not least: “Don’t create a VR app that doesn’t actually require VR”.
Nevertheless, I’d recommend that you look at some existing VR apps and be impressed and enjoy the journey. It’s an intriguing experience, especially if you see it for the first time.


3D Scan per iPad?

Meine Frage/Idee anlässlich meiner Unity 3D-Aktivitäten war, ob es eine einfache Möglichkeit zum 3D Scan per iOS-App gibt: Fündig geworden bin ich hinsichtlich der kostenpflichtigen iPhone-App Trnio (1,09 Euro), die von der Seite https://3dscanexpert.com/3-free-3d-scanning-apps/ empfohlen wurde.

Es war nicht ganz einfach, mit dem iPad mein gewünschtes Objekt, d.h. ein kleines Stofftier-Nilpferd, zu umkreisen. Das Objekt zu drehen und dabei aus der gleichen Position Fotos zu machen, war leider technisch nicht vorgesehen. Nach einigen Versuchen kam ein Ergebnis zustande, mit dem ich recht zufrieden bin und das gerade wegen der Fehler, u.a. bei der Unterlage, etwas künstlerisch wirkt… Das Ganze konnte ohne vorherige Anmeldung bei Trnio erfolgen; die Bilder sind allerdings automatisch auf den dortigen Server geladen worden, wo auch das Modell aus den Einzelbildern errechnet wurde. Das dauerte einige Zeit und daher habe ich auf Nachbearbeitung verzichtet. Bzgl. Exportieren habe ich aus der App heraus die High-Resolution-Variante gewählt und das Format PLY; den temporären Download-Link konnte man sich zumailen lassen. Automatisch gab es auch einen Link zur öffentlichen Webseite mit meinem 3D-Scan: http://trn.io/2/2G70hcJJJU/

Die Weiterverwendung des 3D Scans in Unity 3D erforderte einen Konvertierungs-Zwischenschritt, und zwar über MeshLab, weil in Unity 3D das Format *.ply nicht verwendet werden kann. Am vielversprechendsten erschien mir hierbei das Format Collada (*.dae) mit nachträglicher Integrierung der jpg-Texture-Datei.